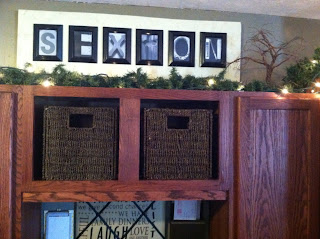
Here is what I ended up with:
So you say, "Yeah? So? I's an office area...." Well, let me tell you, first of all, I stained all these cupboards myself, as well as made the cabinetry plan. I did all this back in December, but that was just the start. I took a looooong break from the home improvement game. This is what my desk area looked like last week prior to redo:
Pretty sad after I did put in all that work a few months back. But, as most surfaces in my house, this one got piled up like crazy. If you also notice, the small cupboard door on the top left is crooked. That's because Christmas Day, the day after I finished getting the cupboards in place, our 8 year old daughter pulled on it and the fruits of my labor were lost quickly. So the first thing I did was take the doors off and replace them with these baskets.
I found them at Walmart for $11 a piece. I knew they'd fit perfectly the minute I saw them. Next, and I didn't take pictures of this, I threaded all the cords down the wall behind the countertop and moved the computer tower into the lower cupboard. This freed up so much counter space!
This is where my laughable construction skills come in:
I wanted to put some under-cabinet lighting in and quite frankly, I thought that the middle cupboard needed some trim to look a little meatier. I just so happened to have 1" oak trim from my half wall project in my kitchen (that is yet to be finished.) I'll have to go buy more to finish my kitchen now, but I was all about doing this at the moment. I was too lazy to go to the garage and find clamps, so to keep the trim in place while I screwed it in place, the stuff in the immediate vicinity worked great. I threw some wood glue in between the pieces, too. I'm unsure if this was protocol, but I didn't think it would hurt. I will tell you, that I did use actual constructuring skills to screw this in, I used wood screws, I predrilled my holes AND I countersunk the screws. If you don't know what that means, ha! I 'yo face, cause I do :)
Oh and I painted inside of the cupboard as well as the wall between the uppers and lowers. And hung the "Sexton" sign on the wall above the cupboard instead of propping it up against the wall up there.
Skip forward, like, an hour, and I decorated because before I did more hard stuff, I wanted to enjoy some of the fruits of my labor. The next step was cabinet hardware. This meant more drilling. I have a very love hate relationship with my drill. In my mind, I'm a pro drilling stuff. In reality, I do a lot of swearing and almost crying while using it. A tool I found that is a must when installing hardware is this little thing found in cabinet hardware section of any big box store:
It's awesome. No mess ups. Well, almost no mess ups. I can't not tell you I don't have a few extra holes in my drawers, but thankfully the cupped pulls hide them. Phew!
After that, I added the battery powered LED lights under the cabinets, picked up and built bar stool and added some office organizers. The bins above the printer came from the dollar section at Target and I just attached them to the wall with Velcro so they can be easily taken down to search for odds and ends. Eventually, I plan on added the under counter retractable key board tray I got off Amazon.com for fifteen bucks. Someone will hopefully come over with a brad nailer and install my toe kicks and vent cover under the cabinets.
If you're wondering where I got the Sexton sign, my brother, TJ, and his girlfriend, Jackie, made it for our family for Christmas this past year! My sister, Melissa, made me the copper tree for Christmas a few years back. I love this piece! I guess my other sister, Jaime, is going to have to make me something for the left side.... (hint, hint, wink, wink)
All the accessories came from either Target or Kohls.
And once again:
BEFORE AFTER


So pretty!
ReplyDeleteWhat a successful office improvement you did over there. Congrats for that simple yet successful office redo.
ReplyDelete